Hands-on tutorial: building an Opera extension
From Opera 15 onward, Opera 11 & 12’s extension format is no longer supported, and instead, we’ve switched to Chromium’s extension model. Check out our new documentation for developing extensions for Opera 15 and higher and start building your own extensions.
This tutorial assumes you have a basic knowledge of CSS and JavaScript.
Contents
- Introduction
- Structure of an Opera extension
- Super simple config.xml
- Adding a little JavaScript
- Making our extension useful
- Conclusion
Introduction
Ah, Slashdot. The grandaddy of wisdom-of-the-crowd news sites and still strong enough to bring web servers to their knees. As a result of its facelift a few years ago, it gained blocks in the sidebar that could be moved or closed, however this functionality is only available to registered members. In this tutorial, we'll see how we can make an Opera extension that will give users the ability to hide and show individual blocks, logged in or not.
Structure of an Opera extension
Firstly, let's look at the structure of Opera extensions. We'll begin with some ground rules:
- Extensions must have a config.xml file, which you can drag into Opera
- Extensions must contain one background process file (typically an index.html)
- JavaScript to be "injected" in a page must be in a folder named includes
- The config.xml and other files must be zipped up and renamed with a .oex extension
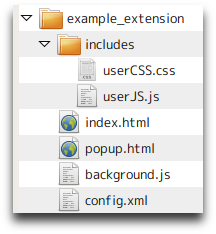
Figure 1: The directory structure of an Opera extension.
As you'd expect, Opera extensions can vary from basic to complex, both in structure and what they do. Figure 1 shows the directory structure of a relatively complex example extension, whereas the simplest type would be a simple JavaScript file applied to a web page. Let's try this simple approach with the Slashdot front page with the aim of hiding all content blocks in the sidebar.
Super simple config.xml
Step one, we need a config.xml file containing things like the name, description and author of the extension. This uses the configuration file for W3C widgets. Think of it as a passport—without this, you ain't goin' nowhere:
<?xml version="1.0" encoding="utf-8"?>
<widget xmlns="http://www.w3.org/ns/widgets">
	<name>Slashdotty</name>
	<description>Hide Slashdot side blocks you don't need.</description>
	<author href="http://people.opera.com/danield/">Daniel Davis (@ourmaninjapan)</author>
</widget>
Adding a little JavaScript
Create an includes folder, then create an empty JavaScript file. In it, we are first going to specify that this script applies only to pages in the slashdot.org domain:
// ==UserScript==
// @include http://slashdot.org/*
// @include https://slashdot.org/*
// @include http://*.slashdot.org/*
// @include https://*.slashdot.org/*
// ==/UserScript==
Next, in the same JavaScript document, we add code to execute when the page has loaded:
window.addEventListener('DOMContentLoaded', function() {
    // Functionality will go here
}, false);
So far so good. Now to go through all the blocks on the page. Unfortunately some blocks don't have IDs but all the block titles do, so we'll use those. Thanks to the Selectors API, this is easy with the following line:
var block_titles = document.querySelectorAll('.block .title');
The result is an array of all the elements in the page with a class name of title within elements with a class name of block. Thankfully, Slashdot uses a consistent naming pattern, blockname-title and blockname-content, so if we remove the -title suffix from each title, we're left with the block name. To get the ID of the block's content, we just add the -content suffix. We need a loop to do that, like so:
var block_name, block_content; // Declare variables outside the loop for efficiency.
for (var i = 0, block_title; block_title = block_titles[i]; i++) {
    block_name = block_title.getAttribute('id').replace('-title', '');
    block_content = document.getElementById(block_name + '-content');
}
The final part of this stage is to set the display property to none for each block's content. Combining it with the previous steps, we get:
// ==UserScript==
// @include http://slashdot.org/*
// @include https://slashdot.org/*
// @include http://*.slashdot.org/*
// @include https://*.slashdot.org/*
// ==/UserScript==

window.addEventListener('DOMContentLoaded', function() {
    var block_titles = document.querySelectorAll('.block .title');
    var block_name, block_content; // Declare variables outside the loop for efficiency.
    for (var i = 0, block_title; block_title = block_titles[i]; i++) {
        // Remove the "-title" suffix to get the block name
        block_name = block_title.getAttribute('id').replace('-title', '');
        block_content = document.getElementById(block_name + '-content');
        // Check for the block's existence to avoid errors
        if (block_content) {
            block_content.style.display = 'none';
        }
    }
}, false);
Download the extension so far. (Rename it with a .zip extension to inspect its contents.)
Making our extension useful
Looking good! All that's remaining is to give the user control over which blocks are shown and hidden. To do this, we remove the line setting the block content's display to none and add two features. One is some clickable text in each block and the other is a function to change the value of the block content's display property to none or block. So, first things first, let's get the function ready:
// Function to show and hide a block's content
function addToggle(block_content, block_toggle) {
    var block_style = block_content.style;
    block_toggle.addEventListener('click', function() {
        block_style.display = (block_style.display !== 'none') ? 'none' : 'block';
    }, false);
}
It's worth mentioning that we have two arguments—a block's content element and toggle element—but in our example these are not essential. This is because the addToggle function is enclosed in a higher-level, anonymous function that executes when the page loads, however using arguments makes the function more portable for use in other projects.
As you can see, we set the display value with a nifty one line if statement. We could equally have used the following code which does the same thing but is more lengthy:
if (block_style.display !== 'none') {
    block_style.display = 'none';
} else {
    block_style.display = 'block';
}
The final piece of our extension jigsaw is something for the user to click, i.e. the block_toggle element that we pass to the addToggle function above. For simplicity, we'll just create a span element with static text and, in our loop, add it to each block's title, like so:
if (block_content) {
    // Add a show/hide text link
    block_toggle = document.createElement('span');
    block_toggle.textContent = 'Hide/Show';
    block_title.appendChild(block_toggle);
    addToggle(block_content, block_toggle);
}
Putting it all together, our complete slashdotty.js should look like this:
// ==UserScript==
// @include http://slashdot.org/*
// @include https://slashdot.org/*
// @include http://*.slashdot.org/*
// @include https://*.slashdot.org/*
// ==/UserScript==

window.addEventListener('DOMContentLoaded', function() {
    // Function to show and hide a block's content
    function addToggle(block_content, block_toggle) {
        var block_style = block_content.style;
        block_toggle.addEventListener('click', function() {
            block_style.display = (block_style.display !== 'none') ? 'none' : 'block';
        }, false);
    }

    var block_titles = document.querySelectorAll('.block .title');
    var block_name, block_content, block_toggle; // Declare variables outside the loop for efficiency.
    for (var i = 0, block_title; block_title = block_titles[i]; i++) {
        // Remove the "-title" suffix to get the block name
        block_name = block_title.getAttribute('id').replace('-title', '');
        block_content = document.getElementById(block_name + '-content');
        if (block_content) {
            // Add a show/hide text link
            block_toggle = document.createElement('span');
            block_toggle.textContent = 'Hide/Show';
            block_title.appendChild(block_toggle);
            addToggle(block_content, block_toggle);
        }
    }
}, false);
Download the completed extension, which also includes an extension icon. (Rename it with a .zip extension to inspect its contents.)
If you are building up the extension yourself, now is the time to zip it up, change the file extension to .oex, and test it out.
Note on zipping extensions
You need to make sure you zip up your extension so that the files and directories that comprise it are in the root of the zip, and not inside a folder. To ensure this, make sure that you zip up the files inside your extension directory, and not the directory itself. Subtle, but it makes all the difference.
Conclusion
Hopefully this has helped you on your way to making Opera extensions. We hope you'll enjoy to taking this code and creating your own, or improving on what's here, for example by locally storing each block's state or by dynamically changing the toggle text based on each block's state. Extra points if you can animate the block with CSS3! Don't forget to share your completed work so users can benefit from it and other developers can learn from it.
This article is licensed under a Creative Commons Attribution 3.0 Unported license.
Comments
The forum archive of this article is still available on My Opera.
-

Thank you! :)
No new comments accepted.Martin Schneider
Saturday, September 22, 2012