Opera Unite developer’s primer — revisited
24th April 2012: Please note
Starting with Opera 12, Opera Unite will be turned off for new users and completely removed in a later release. If you're interested in building addons for Opera, we recommend going with our extensions platform — check out our extensions documentation to get started.
Content contributions by Arve, Chris, Zi Bin and Lissy.
Introduction
Opera Unite features a Web server running inside the Opera browser, which allows you to do some amazing things. At the touch of a button, you can share images, documents, video, music, games, collaborative applications and all manner of other things with your friends and colleagues. We first released an Opera Labs build containing an early version of the Opera Unite server back in 2009, and now it's included in the latest version of Opera for desktop (although not enabled by default).
This article gets you started on the road to Opera Unite application development — it describes how the Opera Unite server in Opera works and how it can be used. Below I will briefly recap some of the basic concepts related to Opera Unite, show how you can enable the Web server in your browser, and give an example of how to write a simple Opera Unite blog application.
The contents of this article are as follows:
- Basic concepts
- Enabling your Web server
- Creating an Opera Unite Application: A simple blog
- Using your Opera Unite application
- Viewing your Opera Unite application
- Publishing your Opera Unite application to unite.opera.com
- Further reading
Basic concepts
In this section we’ll run through the basics of how Opera Unite works, and how Opera Unite applications are constructed.
What is Opera Unite?
Opera Unite is a Web server running inside the Opera Web browser, allowing the user to install applications and share these applications with their friends and colleagues (or everyone, if they wish). The Opera Unite server provides a proxy between the server and its clients (found at unite.opera.com) to avoid the need for any special firewall configuration.
Opera Unite proxy
Traditionally when a user runs a Web server in a home network the network has a device that acts as a firewall, which needs to be configured separately, as illustrated in Figure 1.

Figure 1: A traditional Web server setup
Typically, the user will need to open ports and enable port forwarding to a local computer in order for people outside the firewall to be able to access the server.
However, when the user is using Opera Unite, no configuration is needed, as seen in Figure 2.
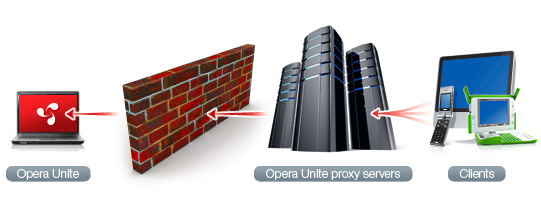
Figure 2: The set up when using the Opera Unite server in your browser
The Web server initiates a connection to the proxy, which uses this to pass information back about incoming requests.
Note that the proxy is really only a fallback mechanism to ensure that data can be delivered in case NAT traversal fails. Opera Unite has support for UPnP, which allows you to share your data using direct connections to your computer, if available. This can make loading speeds for your applications faster as they will bypass the proxy server. However, as it is up to each application to load content using the direct connection, it may not always run applications faster. UPnP has no authentication mechanism, and assumes that local systems and their users are completely trustworthy.
Opera Unite applications
Opera Unite applications have a config.xml file containing fundamental information about the application, and a fairly standard web site directory structure. In these respects they are very similar to Opera Widgets, although the way Opera Unite applications are run/used is very different to Opera Widgets. They also differ in other ways — unlike in Opera Widgets, Opera Unite config.xml files must also contain a feature element like this:
<feature name="http://xmlns.opera.com/webserver">
  <param name="type" value="service"/>
  <param name="servicepath" value="blog"/>
</feature>
In this case, a special JavaScript object — opera.io.webserver — becomes available to the application. See the Opera Unite Web Server JavaScript API for more information.
As the Opera Widgets technology is used, the Opera Unite application can provide the person running the Opera Unite server with a simple way of controlling and configuring it, all using standard HTML, CSS and JavaScript. Opera Unite applications do, however, get access to functionality normally not present in widgets or Web pages, for example a sandboxed file system.
For those of you who are interested in learning more about Opera Widgets, you can find more Widgets articles on dev.opera.
Let’s move on, get Opera Unite enabled, and start building up a simple Opera Unite application.
Enabling your Web server
For security and performance reasons, the Web server does not run by default when Opera is started. You enable the server by selecting Tools > Opera Unite Server > Enable Opera Unite, or by opening an Opera Unite application. When you do so, a dialog pops up asking you to specify a username and password. This is your My Opera username and password.
Note that only My Opera usernames containing valid URL characters will work with Opera Unite. Invalid characters include “/”, “.”, “_” and space.
In the next wizard screen, you need to define a device. You may select a device name from the drop-down list, or specify your own. The device name is used to identify your server via the proxy. It will be available via a URL like the following:
http://devicename.username.proxyaddress/applicationnameSo, to visit the application test on the server your_device on
operaunite.com, the URL becomes:
http://your_device.your_username.operaunite.com/testCreating the Opera Unite application: A simple blog
Here is a short walk-through for creating a simple blogging application that allows the user to write blog entries. Once stored, the entries are immediately available to the world through the Opera Unite server.
The application has two parts: One is a configuration view for the application, where the owner can configure and control it. The other part is a series of Web pages generated or served by the application, which are visible to the user.
For those who just can’t wait, you can download the Opera Unite blog source code and start playing with it already. It is packaged with a .ua extension, the default extension for Opera Unite applications. You can unzip the package to look at the source code or drag the package into the Opera browser to fire up the Opera Unite blog example.
Files and folders in the application
The blog application will contain the files and folders shown in Figure 3:

Figure 3: The directory structure of the application
config.xml: Configuration file for the application.index.html: Starting logic for the application, including scripts.script/script.js: The actual Web server code.
Of these, only config.xml and index.html are required.
You may include a public_html folder, which is a magic
folder in Opera Unite applications. Normally, files and folders inside your application are not available to users requesting your application, so if you want to distribute a separate stylesheet, static images and similar, those files go inside here. These files are mapped to the relative root of your application, so a file named cats.png inside the public_html folder of the helloOperaUnite application will be available at
http://your_device.your_username.operaunite.com/helloOperaUnite/cats.pngConfiguring the application: config.xml
This application will be packaged in the same way as an Opera Widget, so we’ll need to define a config.xml file. The file is just like a normal Opera Widgets’ config.xml file, with a few extra details. In order to identify your application as an Opera Unite application, you need to add a feature element to the widget element in your config.xml file.
Please note that Opera Widgets are packaged as regular zip files and renamed to use the extension .wgt, whereas Opera Unite applications are packaged and renamed to use the extension .ua to denote “Unite Application”.
<widget>
  <widgetname>My blogging application</widgetname>
  <description>Blogging application example from the Opera Unite applications primer.</description>
  <author>
    <name>Hans S. Toemmerholt</name>
    <organisation>Opera Software ASA</organisation>
  </author>
  <feature name="http://xmlns.opera.com/webserver">
    <param name="type" value="service"/>
    <param name="servicepath" value="blog"/>
  </feature>
</widget>
The widgetname element of the application also acts as its application name. This is the name which will be shown to the user when installing and using the application.
You may also add a servicepath element to the config.xml file.
The content of this element must be a valid part of a URI and defines what the name of your application will be in the URI of the application.
If this element is not present, Opera will attempt to use the content of the
widgetname element as the URI component. If this name is not valid as a URI component, the installation of the application will fail with an error message.
When the application is packaged and run, the above config.xml will make it respond to
http://your_device.your_username.operaunite.com/blog/Tying it together: index.html
An application has no UI beyond the Web pages it produces. index.html is the starting point for the application, so that is the UI. In our example, we’ll use a minimal HTML 5 file with a reference to the script we’re using:
<!DOCTYPE html>
<script src="script/script.js"></script>
Creating the script: script.js
Note the link to the script file script.js in the above code snippet. The Web server listens to requests made from clients (users browsing the URL of the application) and creates responses that are sent back. The response is typically a generated Web page containing information.
The functionality in Opera Unite is exposed to developers through a set of JavaScript APIs, including objects representing the Web server, connections, incoming requests and outgoing responses.
What follows is a walk-through of the script.
The request event listeners
A Web server handles requests from clients and sends responses back
to them. The Opera Unite Web server is event-based and will raise a DOM event in the application every time a Web browser makes a connection to the server asking for files related to the Opera Unite application. In order to respond to such events, we need to set up event listeners. This is done in window.onload:
var webserver;
var entries = [];
window.onload = function () {
  webserver = opera.io.webserver
  if (webserver)
  {
    // Handle requests for various URLs
    webserver.addEventListener('_index', showEntryList, false);
    webserver.addEventListener('entry', showEntry, false);
    webserver.addEventListener('form', showForm, false);
    webserver.addEventListener('save', saveEntry, false);
  }
}
What is going on here?
We are checking if the application is actually a web application, by
checking for the webserver object. If it is present, we add four event listeners — _index,
entry, form and save.
When these listeners are set up, the application will now call one of the functions each time a user visits one of the following URLs:
http://your_device.your_username.operaunite.com/blog/
http://your_device.your_username.operaunite.com/blog/entry/
http://your_device.your_username.operaunite.com/blog/form/
The _index request is special, and means a request to the root path of the application. Also note that, as we shall see, the user will not visit “save” directly — only through the form.
Showing a list of blog entries
The code for the _index request, the showEntryList function, is quite simple. When receiving a request, it writes back a HTML page with a list of the saved entries.
function showEntryList(e)
{
  var response = e.connection.response;
  response.write( '<!DOCTYPE html>'
    + '<html><head><title>Entries</title></head>'
    + '<body><ul>'
  );

  for ( var i = 0, entry; entry = entries[i]; i++ )
  {
    response.write('<li>'+entry.date+': <a href="entry?id='+i+'">'+entry.title+'</a></li>');
  }

  response.write('</ul>'
    + '<p><a href="form">Add en entry</a></p>'
    + '</body></html>'
  );
  response.close();
}
Line-by-line, the script does the following:
It first gets a reference to the response object. This is the object that holds the methods necessary to send output back to the client:
var response = e.connection.response;The write method then writes the content to the web
browser that requested the page. First, we write a simple HTML shell:
response.write('<!DOCTYPE html>'
  + '<html><head><title>Entries</title></head>'
  + '<body><ul>'
);
The existing blog entries are marked up as a list with links to the individual entries:
for ( var i = 0, entry; entry = entries[i]; i++ )
{
  response.write('<li>'+entry.date+': <a href="entry?id='+i+'">'+entry.title+'</a></li>');
}
Finally, we close the connection.
response.close();Showing a single entry
Next, we need to output something when the user clicks a link to an entry:
function showEntry(e)
{
  var index = e.connection.request.queryItems['id'][0];
  var entry = entries[index];
  // ToDo Should have error handling here
  var response = e.connection.response;
  response.write('<!DOCTYPE html>'
    + '<html><head><title>'+entry.title+'</title></head>'
    + '<body><h1>'+entry.title+'</h1>'
    + '<p>'+entry.date+'</p>'
    + '<div>'+entry.text+'</div>'
    + '</body></html>'
  );
  response.close();
}
Line-by-line, the script does the following:
It first gets a reference to the request object, which
contains information about the incoming request:
var request = e.connection.request;CGI GET arguments are stored in the queryItems
property of the request. We get the id of the entry to display.
Note that the the same CGI argument may have multiple values:
var index = request.queryItems['id'][0];Next we get the corresponding blog entry:
var entry = entries[index];The write method then writes the content to the web
browser that requested the page. The title, date and text of the blog entry
are wrapped in suitable markup:
response.write('<!DOCTYPE html>'
  + '<html><head><title>'+entry.title+'</title></head>'
  + '<body><h1>'+entry.title+'</h1>'
  + '<p>'+entry.date+'</p>'
  + '<div>'+entry.text+'</div>'
  + '</body></html>'
);
Showing the form for adding an entry
When you click the “Add an entry” link, a classic Web form is displayed:
function showForm(e)
{
  var response = e.connection.response;
  response.write('<!DOCTYPE html>'
    + '<html><head><title>Add entry</title></head>'
    + '<body><h1>Add entry</h1>'
    + '<form method="post" action="save">'
    + '<p><label for="namefield">Title</label> <input id="nameField" type="text" name="title"></p>'
    + '<p><label for="textArea">Text</label> <textarea id="textArea" name="text"></textarea></p>'
    + '<p><input type="submit" name="Add entry"></p>'
    + '</form>'
    + '</body></html>'
  );
  response.close();
}
This could be a lot more complicated, eg handling error messages, adding pre-populated values, input validation and so on. Ideally you should also offer some authentication scheme to guard against potentially destructive data operations, but we’ve kept it simple to highlight the Opera Unite knowledge.
Saving an entry
Finally, when you submit the form, a new entry should be saved. For now, entries are stored in a simple array so will be lost when the application is restarted, but it wouldn’t be so hard to extend the example to provide a means of retaining the blog entries.
function saveEntry(e)
{
  var request = e.connection.request
  var response = e.connection.response;
  // Get POST data
  var title = request.bodyItems['title'][0];
  var text = request.bodyItems['text'][0];
  entries.push({
    'title' : title,
    'text' : text,
    'date' : new Date()
  });
  // Redirect back to the index of the application
  response.setStatusCode(302);
  response.setResponseHeader( 'Location', webserver.currentServicePath );
  response.close();
}
Instead of request.queryItems, we use the bodyItems property to access data sent by POST, in this case the title and the content of the new entry.
var title = request.bodyItems['title'][0];
var text = request.bodyItems['text'][0];
Submitting the form saves the entry, storing it in an array:
entries.push({
  'title' : title,
  'text' : text,
  'date' : new Date()
});
Finally, when the entry is saved, we redirect back to the list of entries:
response.setStatusCode(302);
response.setResponseHeader( 'Location', webserver.currentServicePath );
response.close();
Here we create a standard HTTP temporary redirect back to the root of the application, represented by the webserver.currentServicePath property. This will fire an _index request, and the list of entries will then be shown.
Again, in a production-level you should add error handling and status messages to this.
Using your Opera Unite application
In order to get your Opera Unite application running, you simply need to load the application. Click and drag its config.xml file or a zipped version of the whole application into your browser window. Alternatively, open config.xml from a file
dialog. If you have not previously started any Opera Unite applications, the Opera Unite configuration dialog will now appear.
Double click My blogging application in the Opera Unite applications pane and you should get a page appearing in the browser window, as seen in Figure 4:
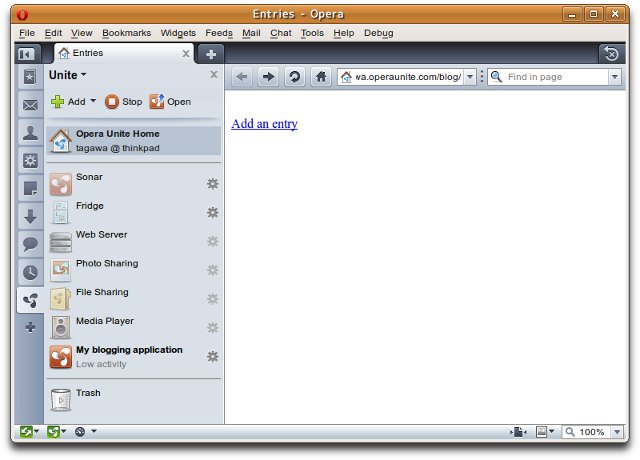
Figure 4: The blog application main screen.
Clicking the Add an entry link will take you to a form that allows you to add a blog entry, as seen in Figure 5.
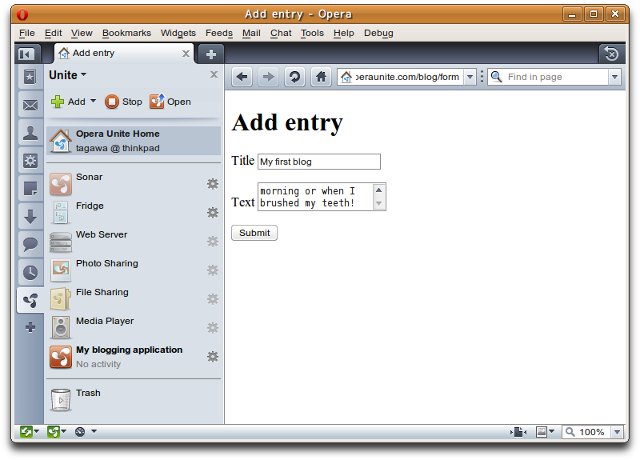
Figure 5: The form for entering a new blog post.
When you enter some text and press submit, you are taken back to the blog main screen and your blog entry is available to view. You can click on the blog entry title to view the post. Add a few blog entries, have a play around, and you should end up with something like Figure 6.
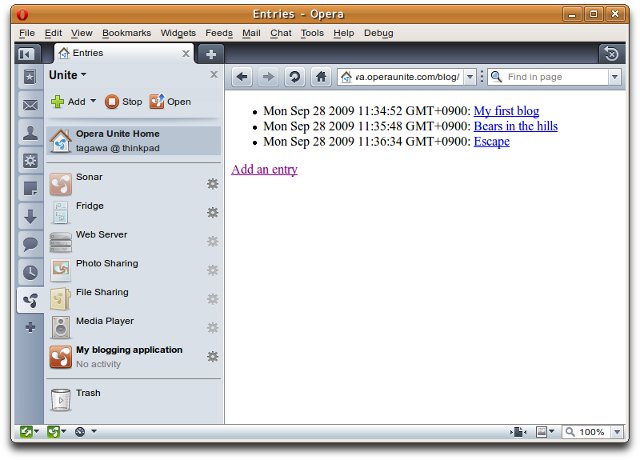
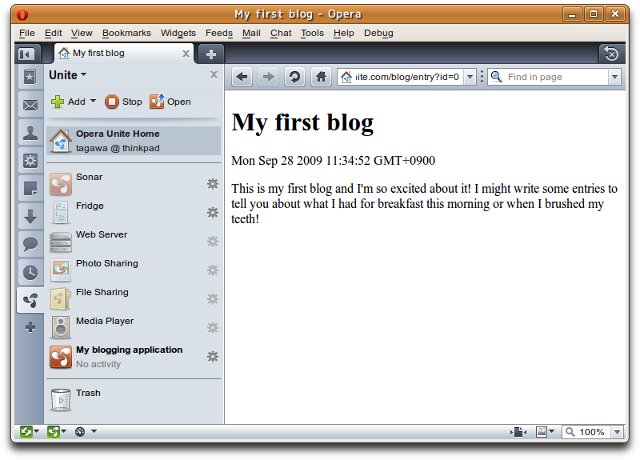
Figure 6: Our blog is now nicely populated.
Viewing your Opera Unite application
If you followed this guide and started the application in Opera, you should now have a functioning web application. Anyone can visit it by going to the URL
http://devicename.username.proxyaddress/applicationnameIn this case, if the device is called your_device and it’s running the blog application, the URL becomes:
http://your_device.username.operaunite.com/blogAs you saw when running the example above, you can visit the root address of the device to see the installed applications on a system, for example:
http://your_device.username.operaunite.com/This page will contain information on which applications are installed
on the system, and if the information is found in config.xml, it will
also list information on each application, including author, description, etc.
Publishing your Opera Unite application onto unite.opera.com
So now you’ve put together a cool Opera Unite application you not only want to let people use it via your Opera Unite server, you also want to make it available for others to download and install on their Opera Unite servers, right? So how do we do this? The answer is to publish them to unite.opera.com — this is the site where Opera Unite applications are distributed. This section will show you how.
Before publishing
Before publishing you should test your application to find bugs. Test on different platforms, devices and Opera browser versions if you can. Also remember that people using your applications can do so from any browser, not just Opera, so test your application’s pages in other browsers (Firefox, Safari, etc.).
If you are having trouble getting your application to work and you are convinced that the actual code of the application is right, check your config.xml file for errors. It needs to work for the application to be accepted. Opening the file in a different browser will check it for well-formedness. Check also that your config.xml file contains enough information. We will use this file to supply information about your application to unite.opera.com and to the Opera Unite application page on computers where the application is installed.
Also consider translating the application, if this is appropriate and you can do so.
Finally, take a screenshot of the application in action, as described below.
Publishing your application
To do this, you need to visit Opera’s Publish page. Select your application archive file in the archive file chooser dialog and upload it. Read through and verify the information taken from your config.xml file. Feel free to add more text if you wish.
Next up, select your screenshot in the screenshot file dialog box so that others will be able to see what your application looks like before they try it out.
You also need to select the target devices that your application is designed to be used with. Make sure you have tested it on those devices. Select a relevant group for your application. The last step is to select the target languages for your application. Make sure you have supplied translations for all the languages you select.
How can I get people to try my application?
When you have spent a lot of time making an application, you’ll naturally want people to try it out. To increase the number of views, use the application descriptions to tell potential users what to expect when running the application. Each application has a short description, automatically copied from your config.xml file, and a long description where you can provide more details and tips for use.
Use the short description to catch the user’s eye, stating what your application does and what value users can get out of it. It may be a tagline, but it should be informative. You should avoid phrases like “Download me” or “This is a super cool app” which are likely to turn users away. Use the long description to tell people what features your application has, how it was implemented, about changes in different versions, rules for games, and so on.
Finally, don’t forget to take a screenshot of your application in action. For inspiration, the Opera Unite team’s applications are a good place to start.
Note that you should ideally make your screenshots 445 x 230 pixels — this is the size we have been using on the Opera Unite web site. If you use different-sized screenshots they will be resized, which may lead to undesirable results.
Approval of Opera Unite applications
All applications need to be approved by Opera Software staff. We check for errors to ensure that our users have a good online experience, but we do not take responsibility for the content of the applications or make any guarantees about the functionality. See our disclaimer.
What are the guidelines for approval of an Opera Unite application?
These are some of the guidelines that apply to applications:
- The application must have a sensible name and description.
- The application must not have obvious bugs, so ensure that you test it before publishing.
- The application must not contain malicious or destructive code.
- The application must not contain or use copyrighted information for which you do not hold the rights.
- The application must not contain or point to adult or hateful content.
- The application should serve standards-compliant HTML pages that are viewable in all modern browsers on a variety of devices.
Further reading
Now that you are familiar with the basics of creating and publishing Opera Unite applications, you might want to delve a bit deeper:
- The Opera Unite JavaScript API — JSDoc-style reference for the JavaScript interfaces and methods available for the Opera Unite Web Server.
- The Opera File I/O JavaScript API — JSDoc-style reference for the JavaScript interfaces and methods available for working with files and directories.
- Markuper: The Opera Unite application template library
- Yusef: The Opera Unite Service Framework
This article is licensed under a Creative Commons Attribution, Non Commercial - Share Alike 2.5 license.
Comments
The forum archive of this article is still available on My Opera.
No new comments accepted.