Creating pseudo 3D games with HTML 5 canvas and raycasting: Part 2
Introduction
This is my second article about creating Wolfenstein-like games with JavaScript, DOM and HTML 5 canvas; the techniques discussed are similar to those used in my WolfenFlickr project. In the first article, I created a basic map for the player to walk around in and a pseudo-3D rendering of the game world using raycasting techniques. In this article I'm first going to improve on the codebase I've already built, optimizing the rendering process to gain better performance and making the collision detection between the player and the walls better. In the second half, I'll implement static sprites to give the castle a bit of atmosphere and finally add an enemy or two. The final game example looks like this:
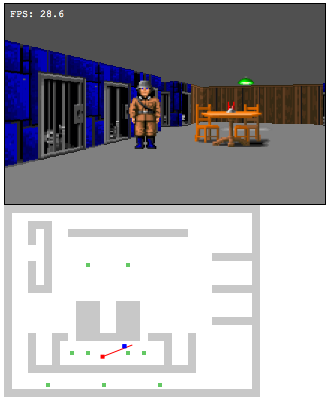
The full (MIT licensed) sample code is available for download here.
Optimizing
Without further ado, let's get on with optimizing the existing code base.
Splitting the rendering and the game logic
In the first article, rendering and game logic was tied together in the same timer for the sake of simplicity. The first thing I'll do is split that into two. That means pulling the raycasting and rendering out of the gameCycle function and creating a new renderCycle. The heavy work is done during the rendering and will always affect the game speed but if I split them up I can at least get a bit better control over the speed at which these two components run and, if desired, let them run at different frame rates. The gameCycle could for instance run at a fixed number of times per second while the rendering cycle just runs as often as it can. I'll try to ensure that both of them keep to a rate of 30 frames per second.
var lastGameCycleTime = 0;
var gameCycleDelay = 1000 / 30; // aim for 30 fps for game logic

function gameCycle() {
	var now = new Date().getTime();
	// time since last game logic
	var timeDelta = now - lastGameCycleTime;
	move(timeDelta);

	var cycleDelay = gameCycleDelay;
	// the timer will likely not run that fast due to the rendering cycle hogging the cpu
	// so figure out how much time was lost since last cycle
	if (timeDelta > cycleDelay) {
		cycleDelay = Math.max(1, cycleDelay - (timeDelta - cycleDelay))
	}

	lastGameCycleTime = now;
	setTimeout(gameCycle, cycleDelay);
}
In the gameCycle function, I compensate for the lag introduced by the rendering functions by comparing the time since gameCycle was last called to the ideal gameCycleDelay time. I then adjust the delay for the next setTimeout call accordingly.
This time difference is now also used when calling the move function (the one taking care of moving our player).
function move(timeDelta) {
	// time timeDelta has passed since we moved last time. We should have moved after time gameCycleDelay,
	// so calculate how much we should multiply our movement to ensure game speed is constant
	var mul = timeDelta / gameCycleDelay;
	var moveStep = mul * player.speed * player.moveSpeed;	// player will move this far along the current direction vector
	player.rotDeg += mul * player.dir * player.rotSpeed; // add rotation if player is rotating (player.dir != 0)
	player.rotDeg %= 360;
	var snap = (player.rotDeg+360) % 90
	if (snap < 2 || snap > 88) {
		player.rotDeg = Math.round(player.rotDeg / 90) * 90;
	}

	player.rot = player.rotDeg * Math.PI / 180;
	...
}
I can now use the timeDelta time to determine how much time has passed compared to how much should have passed. If you multiply movement and rotation by this factor, the player will move at a steady speed even if the game isn't running at a perfect 30 fps. Note that one drawback of this approach is that if there's enough lag, there is a risk that the player will be able to walk through a wall, unless we either get better collision detection or change the gameCycle so move is called several times, chipping away at the lag.
Since the gameCycle function now only takes care of game logic (for now, only moving the player), a new renderCycle function has been made with the same time managing measures. Check the sample code to see this function.
Optimizing the rendering
Next I'll optimize the rendering process a bit. For each vertical strip, I'm currently using div elements with overflow:hidden to hide the parts of the texture image that don't need to be displayed at each point. If I use CSS clipping instead, I can get rid of those extra div elements, in which case I only have to manipulate half as many DOM elements in each rendering cycle.
Some browsers (Opera) will also perform a bit better if I cut the big texture image into smaller images, each containing one wall texture. I'll add a flag for toggling between using a single large texture image and using separate images. By cutting up the texture in smaller images you can also get prettier textures for Opera without exceeding the 19 colors limit that I talked about in the first article, since the textures don't have to share the same few colors anymore. The original Wolfenstein 3D textures used only 16 colors each so we've got more than enough now. Firefox appears to do much better with the large, monolithic texture image, so I'll keep that functionality and automatically toggle it with a bit of dirty browser sniffing.
There's also a bit to be gained if you only set the style properties of the strips when they actually change. As you move around the level, all the strips change positions, dimensions and clipping, but they don't necessarily all change if you've only moved or rotated a small amount since the last rendering call. So I'll extend each strip element with an oldStyles object that I can compare the new values to during rendering, before setting the actual style properties.
So, first I'll need to alter our initScreen function, which takes care of creating the strip elements. Instead of creating div elements with img children, the code will now only create img. The new initScreen function looks like this:
function initScreen() {
	var screen = $("screen");
	for (var i=0;i<screenWidth;i+=stripWidth) {
		var strip = dc("img");
		strip.style.position = "absolute";
		strip.style.height = "0px";
		strip.style.left = strip.style.top = "0px";
		if (useSingleTexture) {
			strip.src = (window.opera ? "walls_19color.png" : "walls.png");
		}

		strip.oldStyles = {
			left : 0,
			top : 0,
			width : 0,
			height : 0,
			clip : "",
			src : ""
		};

		screenStrips.push(strip);
		screen.appendChild(strip);
	}
}
You can see how only one DOM element (an img) is created per strip and how I'm creating a pseudo-style object to store the current values.
Next I'll modify the castSingleRay function to work with these new strip objects. In order to use CSS clipping instead of div masking, you don't actually have to change any of the values; they're just used to set different style properties. Instead of creating a rectangular mask using the div, I now use the clip property to create a clipping mask.
The image now needs to be positioned relative to the screen instead of relative to the containing div, so I'll simply add what used to be the div position to the position of the image. The position and dimensions of the div are then used to define the clipping rectangle.
In the code below you can also see how the new values are checked against the oldStyles values before touching the actual element styles.
function castSingleRay(rayAngle, stripIdx) {

	...

	if (dist) {

		...

		var styleHeight;
		if (useSingleTexture) {
			// then adjust the top placement according to which wall texture we need
			imgTop = Math.floor(height * (wallType-1));
			var styleHeight = Math.floor(height * numTextures);
		} else {
			var styleSrc = wallTextures[wallType-1];
			if (strip.oldStyles.src != styleSrc) {
				strip.src = styleSrc;
				strip.oldStyles.src = styleSrc
			}
			var styleHeight = height;
		}
		if (strip.oldStyles.height != styleHeight) {
			strip.style.height = styleHeight + "px";
			strip.oldStyles.height = styleHeight
		}

		var texX = Math.round(textureX*width);
		if (texX > width - stripWidth)
			texX = width - stripWidth;
		var styleWidth = Math.floor(width*2);
		if (strip.oldStyles.width != styleWidth) {
			strip.style.width = styleWidth +"px";
			strip.oldStyles.width = styleWidth;
		}

		var styleTop = top - imgTop;
		if (strip.oldStyles.top != styleTop) {
			strip.style.top = styleTop + "px";
			strip.oldStyles.top = styleTop;
		}

		var styleLeft = stripIdx*stripWidth - texX;
		if (strip.oldStyles.left != styleLeft) {
			strip.style.left = styleLeft + "px";
			strip.oldStyles.left = styleLeft;
		}

		var styleClip = "rect(" + imgTop + ", " + (texX + stripWidth)  + ", " + (imgTop + height) + ", " + texX + ")";
		if (strip.oldStyles.clip != styleClip) {
			strip.style.clip = styleClip;
			strip.oldStyles.clip = styleClip;
		}

		...

	}

	...

}
Try the new optimized demo now. You should get a much smoother experience compared to the earlier version: Demo 1 - Improved performance.
Collision detection
Let's take a look at the collision detection now. In the first article I solved the problem by simply stopping the player if he moved into a wall. While this does make sure you can't walk through walls it doesn't feel very elegant. First of all, it would be nice to keep a bit of distance between the player and the walls, otherwise you can move so close that the textures get super-stretched, which doesn't look very nice. Secondly, we should be able to slide along the walls instead of coming to a dead stop every time you so much as touch a wall.
To solve the distance problem we have to think of something other than simply checking the player position against the map. One solution is to just think of the player as a circle and the walls as line segments. By making sure the circle doesn't intersect any of the line segments, the player will always be kept at a distance of at least the radius of this circle.
Fortunately the map is restricted to the simple grid-based layout, so our calculations can be kept quite simple. Specifically, I just have to make sure that the distance between the player and the closest point on each surrounding wall is equal to or greater than the radius, and since the walls are all horizontal or vertical due to their alignment on the grid, the distance calculation becomes trivial.
So, I'll replace the old isBlocking function with a new checkCollision function. Instead of returning a true/false value indicating whether or not the player can move to the desired position, this function returns the new adjusted position. The isBlocking function is still used inside the checkCollision function to check whether or not a certain tile is solid or not.
function checkCollision(fromX, fromY, toX, toY, radius) {
	var pos = {
		x : fromX,
		y : fromY
	};

	if (toY < 0 || toY >= mapHeight || toX < 0 || toX >= mapWidth)
		return pos;
	var blockX = Math.floor(toX);
	var blockY = Math.floor(toY);

	if (isBlocking(blockX,blockY)) {
		return pos;
	}

	pos.x = toX;
	pos.y = toY;

	var blockTop = isBlocking(blockX,blockY-1);
	var blockBottom = isBlocking(blockX,blockY+1);
	var blockLeft = isBlocking(blockX-1,blockY);
	var blockRight = isBlocking(blockX+1,blockY);

	if (blockTop != 0 && toY - blockY < radius) {
		toY = pos.y = blockY + radius;
	}

	...

	// .. do the same for right, left and bottom tiles
	// is tile to the top-left a wall

	if (isBlocking(blockX-1,blockY-1) != 0 && !(blockTop != 0 && blockLeft != 0)) {
		var dx = toX - blockX;
		var dy = toY - blockY;
		if (dx*dx+dy*dy < radius*radius) {
			if (dx*dx > dy*dy)
				toX = pos.x = blockX + radius;
			else
				toY = pos.y = blockY + radius;
		}
	}

	// .. do the same for top-right, bottom-left and bottom right tiles

	...

	return pos;
}
The player can now smoothly slide along the walls and will retain a minimum distance between them and the walls, keeping both performance and visual quality reasonable even when close to the walls. Try out the new wall collision code: Demo 2 - Wall collision.
Sprites
With that out of the way, let's turn to adding a bit of detail to the world. So far it's just been open space and walls, so it's about time we got some interior decorating done. I'll be using the sprite images shown below:


First I'll define the available item types. This can be done with a simple array of objects containing two pieces of info, the path to the image and a boolean value that defines whether or not this item type blocks the player from going through it.
var itemTypes = [
	{ img : "sprites/tablechairs.png", block : true },	// 0
	{ img : "sprites/armor.png", block : true },		// 1
	{ img : "sprites/plantgreen.png", block : true },	// 2
	{ img : "sprites/lamp.png", block : false }		// 3
];
Then I'll place a few of these around the map. Again the data structure is an array of simple objects.
var mapItems = [
	// lamps in center area
	{type:3, x:10, y:7},
	{type:3, x:15, y:7},
	// lamps in bottom corridor
	{type:3, x:5, y:22},
	{type:3, x:12, y:22},
	{type:3, x:19, y:22},
	// tables in long bottom room
	{type:0, x:10, y:18},
	{type:0, x:15, y:18},
	// lamps in long bottom room
	{type:3, x:8, y:18},
	{type:3, x:17, y:18}
];
I've added a few lamps around the castle and set up a dining room at the bottom of the map. In the zip file linked in the beginning of the article, you will also find sprites for a plant and a suit of armour for you play around with, if you so wish.
Now I'll create an initSprites function to be called from the init function along with initScreen and the other initialization code. This function creates a two-dimensional array corresponding to the map and fills it with the sprite objects defined above in the mapItems array. The sprite objects are also given a few extra properties: its img element, a visible flag and the blocking information mentioned earlier.
var spriteMap;
function initSprites() {
	spriteMap = [];
	for (var y=0;y<map.length;y++) {
		spriteMap[y] = [];
	}

	var screen = $("screen");
	for (var i=0;i<mapItems.length;i++) {
		var sprite = mapItems[i];
		var itemType = itemTypes[sprite.type];
		var img = dc("img");
		img.src = itemType.img;
		img.style.display = "none";
		img.style.position = "absolute";
		sprite.visible = false;
		sprite.block = itemType.block;
		sprite.img = img;
		spriteMap[sprite.y][sprite.x] = sprite;
		screen.appendChild(img);
	}
}
So now I can do a simple spriteMap[y][x] lookup anywhere on the map and check if there's a sprite in that tile. As you can see in the code above, I've added all the img elements as children of the screen element. The trick now is to determine which ones are visible and where on the screen they should go. To do so, I'll tap into the raycasting function castSingleRay:
var visibleSprites = [];
function castSingleRay(rayAngle, stripIdx) {

	...

	while (x >= 0 && x < mapWidth && y >= 0 && y < mapHeight) {
		var wallX = Math.floor(x + (right ? 0 : -1));
		var wallY = Math.floor(y);
		// new sprite checking code
		if (spriteMap[wallY][wallX] && !spriteMap[wallY][wallX].visible) {
			spriteMap[wallY][wallX].visible = true;
			visibleSprites.push(spriteMap[wallY][wallX]);
		}

		...

	...

}
As you might recall, this function is called once every frame for each of the vertical strips on the screen. When the rays are cast, it moves outward in steps that make sure it touches all the tiles that the ray goes through, so I can simply check against the sprite map at every step and check if there's a sprite there. If there is, the sprite's visibility is toggled (if we haven't done so already) and it is added to the visibleSprites array. This is of course done for both the horizontal and the vertical run.
In the renderCycle I will now add two new calls, one to clear the list of visible sprites and one to render the newly marked visible sprites. The former is done before the raycasting and the latter is done after.
function renderCycle() {

	...

	clearSprites();
	castRays();
	renderSprites();

	...
}
The clearSprites function is pretty straight-forward.
function clearSprites() {
	// clear the visible sprites array but keep a copy in oldVisibleSprites for later.
	// also mark all the sprites as not visible so they can be added to visibleSprites again during raycasting.
	oldVisibleSprites = [];
	for (var i=0;i<visibleSprites.length;i++) {
		var sprite = visibleSprites[i];
		oldVisibleSprites[i] = sprite;
		sprite.visible = false;
	}
	visibleSprites = [];
}
And now, finally, I'll turn my attention to the actual rendering of the sprites. U'll loop through all the sprites found during the raycasting, ie the ones that are now in the visibleSprites array. For each visible sprite I first translate its position into the viewer space so I have its position relative to where the player is. Note that 0.5 is added to the x and y coordinates to get the center of the tile. Simply using the sprite's x and y would give us the top-left corner of the map tile. Knowing the player's current rotation angle, the rest is calculated with simple trigonometry.
function renderSprites() {
	for (var i=0;i<visibleSprites.length;i++) {
		var sprite = visibleSprites[i];
		var img = sprite.img;
		img.style.display = "block";

		// translate position to viewer space
		var dx = sprite.x + 0.5 - player.x;
		var dy = sprite.y + 0.5 - player.y;

		// distance to sprite
		var dist = Math.sqrt(dx*dx + dy*dy);

		// sprite angle relative to viewing angle
		var spriteAngle = Math.atan2(dy, dx) - player.rot;

		// size of the sprite
		var size = viewDist / (Math.cos(spriteAngle) * dist);

		// x-position on screen
		var x = Math.tan(spriteAngle) * viewDist;
		img.style.left = (screenWidth/2 + x - size/2) + "px";

		// y is constant since we keep all sprites at the same height and vertical position
		img.style.top = ((screenHeight-size)/2)+"px";
		var dbx = sprite.x - player.x;
		var dby = sprite.y - player.y;
		img.style.width = size + "px";
		img.style.height =  size + "px";
		var blockDist = dbx*dbx + dby*dby;
		img.style.zIndex = -Math.floor(blockDist*1000);
	}

	// hide the sprites that are no longer visible
	for (var i=0;i<oldVisibleSprites.length;i++) {
		var sprite = oldVisibleSprites[i];
		if (visibleSprites.indexOf(sprite) < 0) {
			sprite.visible = false;
			sprite.img.style.display = "none";
		}
	}
}
Optionally, an approach similar to the one used in the raycasting with an oldStyles object can be implemented for sprites as well, possibly gaining a bit of extra performance. Anyway, now the sprites are placed correctly on the screen and only those that are in the player's view are shown. However, as seen in Figure 1 things are a bit messed up since I haven't dealt with the z-order of the elements on the screen yet.
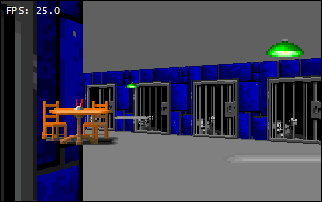
Figure 1: Sprites with z-index issues.
If we were actually drawing the walls and sprites pixel by pixel, we would have to sort these objects according to how far away there were and draw the most distant ones first to keep objects that should be occluded from rendering in front of closer objects. Fortunately the situation is much simpler as we are dealing with HTML elements. This means we have a powerful tool to solve this problem, the CSS zIndex property. I can simply set the zIndex property to a value proportional to the distance to the sprite or wall strip in question. Then the browser will take care of the rest and save us from having to do any sorting at all.
function renderSprites() {
	for (var i=0;i<visibleSprites.length;i++) {

		...

		var blockDist = dbx*dbx + dby*dby;
		img.style.zIndex = -Math.floor(blockDist*1000);
	}
}

function castSingleRay(rayAngle, stripIdx) {

	...

	if (dist) {

		...

		var wallDist = dwx*dwx + dwy*dwy;
		strip.style.zIndex = -Math.floor(wallDist*1000);
	}
}
And now the sprites and walls are layered in the correct order, as seen in Figure 2. Since a high zIndex means the DOM element will be displayed on top of lower-indexed elements we use the negative value of the distance. Since the distances are rather small numerically, we also multiply by 1000 (or some other high number) to get sufficiently different integer values.
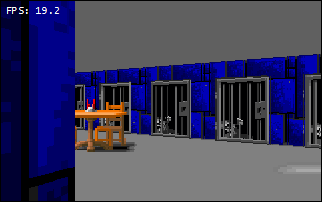
Figure 2: Sprites and walls in z-index harmony.
Finally, the isBlocking function is altered to also take blocking sprites into account, making sure you can't run through the tables.
function isBlocking(x,y) {

	...

	if (spriteMap[iy][ix] && spriteMap[iy][ix].block)
		return true;
	return false;
}
Enemies
So far our little castle has been quite safe, so how about we add a little excitement? To do this, the first thing I need to do is add a second kind of sprite, one that is capable of moving around the level in the same way as the player. Figure 3 shows the enemy sprite image I'll be using (this is a set of CSS sprites - all one image):

Figure 3: Guard sprite with 13 states.
I will define the enemy types and the locations of enemies on the map in much same way as I did with the static sprites. Each enemy type (so far there's just the one guard type) has a few properties such as movement speed, rotation speed and the total number of "states". The states correspond to each image in the sprite set above - so an enemy in state 0 is standing still while an enemy in state 10 is lying dead on the floor. In this article I'll only be using the first 5 states to make the guards chase us around the map. I'll save combat for another day.
var enemyTypes = [
	{ img : "guard.png", moveSpeed : 0.05, rotSpeed : 3, totalStates : 13 }
];

var mapEnemies = [
	{type : 0, x : 17.5, y : 4.5},
	{type : 0, x : 25.5, y : 16.5}
];
Next I'll need an initEnemies function, which will be called from init along with the rest. This function works a bit like the initSprites function I just made, but it is also different in a number of ways. Whereas the static sprites could all be tied to a specific tile on the map, the enemies are of course free to go whereever they want so we can't use the same two-dimensional map structure to store their locations. Instead I'll take the easy way out and simply keep all the enemies in a single array, even if this does mean I'll have to traverse this array on each frame to determine which ones to render. Since I won't be dealing with a lot of enemies (yet, at least) this shouldn't too big of a problem for now.
var enemies = [];
function initEnemies() {
	var screen = $("screen");
	for (var i=0;i<mapEnemies.length;i++) {
		var enemy = mapEnemies[i];
		var type = enemyTypes[enemy.type];
		var img = dc("img");
		img.src = type.img;
		img.style.display = "none";
		img.style.position = "absolute";

		enemy.state = 0;
		enemy.rot = 0;
		enemy.dir = 0;
		enemy.speed = 0;
		enemy.moveSpeed = type.moveSpeed;
		enemy.rotSpeed = type.rotSpeed;
		enemy.totalStates = type.totalStates;
		enemy.oldStyles = {
			left : 0,
			top : 0,
			width : 0,
			height : 0,
			clip : "",
			display : "none",
			zIndex : 0
		};
		enemy.img = img;
		enemies.push(enemy);
		screen.appendChild(img);
	}
}
In the same way as I did for the sprites, I'll create an img element for each enemy and add some extra information to the enemy object. The next thing I need to do is create a renderEnemies function, which is called from renderCycle. The basic idea here is to loop through the enemies and determine if they're in front of us by looking at the relative angle between them and the direction we're looking in (we should actually be using the field-of-view for this). If they are, the code will render him in much the same way as the sprites are rendered. If they are not in front of us, our code simply hides the sprite images. See the code comments below for more details.
function renderEnemies() {
	for (var i=0;i<enemies.length;i++) {
		var enemy = enemies[i];
		var img = enemy.img;
		var dx = enemy.x - player.x;
		var dy = enemy.y - player.y;
		var angle = Math.atan2(dy, dx) - player.rot;	// angle relative to player direction
		if (angle < -Math.PI) angle += 2*Math.PI; // make angle from +/- PI
		if (angle >= Math.PI) angle -= 2*Math.PI;
		// is enemy in front of player?
		if (angle > -Math.PI*0.5 && angle < Math.PI*0.5) {
			var distSquared = dx*dx + dy*dy;
			var dist = Math.sqrt(distSquared);
			var size = viewDist / (Math.cos(angle) * dist);
			var x = Math.tan(angle) * viewDist;
			var style = img.style;
			var oldStyles = enemy.oldStyles;

			// height is equal to the sprite size
			if (size != oldStyles.height) {
				style.height =  size + "px";
				oldStyles.height = size;
			}
			// width is equal to the sprite size times the total number of states
			var styleWidth = size * enemy.totalStates;
			if (styleWidth != oldStyles.width) {
				style.width = styleWidth + "px";
				oldStyles.width = styleWidth;
			}

			// top position is halfway down the screen, minus half the sprite height
			var styleTop = ((screenHeight-size)/2);
			if (styleTop != oldStyles.top) {
				style.top = styleTop + "px";
				oldStyles.top = styleTop;
			}

			// place at x position, adjusted for sprite size and the current sprite state
			var styleLeft = (screenWidth/2 + x - size/2 - size*enemy.state);
			if (styleLeft != oldStyles.left) {
				style.left = styleLeft + "px";
				oldStyles.left = styleLeft;
			}

			var styleZIndex = -(distSquared*1000)>>0;
			if (styleZIndex != oldStyles.zIndex) {
				style.zIndex = styleZIndex;
				oldStyles.zIndex = styleZIndex;
			}

			var styleDisplay = "block";
			if (styleDisplay != oldStyles.display) {
				style.display = styleDisplay;
				oldStyles.display = styleDisplay;
			}

			var styleClip = "rect(0, " + (size*(enemy.state+1)) + ", " + size + ", " + (size*(enemy.state)) + ")";
			if (styleClip != oldStyles.clip) {
				style.clip = styleClip;
				oldStyles.clip = styleClip;
			}
		} else {
			var styleDisplay = "none";
			if (styleDisplay != enemy.oldStyles.display) {
				img.style.display = styleDisplay;
				enemy.oldStyles.display = styleDisplay;
			}
		}
	}
}
As you can see, the oldStyles object is once again used to make sure the style properties are only set if the values have actually changed. The x position on the screen is determined as if it were a static sprite, only now I'm taking into account the current state of the sprite. For example, if the current state is 3 (part of the walk cycle) the sprite image is positioned [3 * sprite_size] to the left. A CSS clipping rectangle then makes sure that only the current state is visible.
So, that gives us a couple of enemies standing around, looking at us suspiciously but not doing much else, as shown in Figure 4.
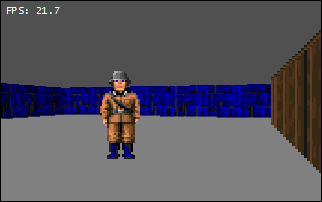
Figure 4: The guards don't want to move yet.
Time for some AI! Ok, intelligence might be stretching it, but let's see if we can't at least get them to move a bit. In the gameCycle I'll add a call to an ai function, which will take care of evaluating the enemy actions. Next I'll make a small modification to the move function. Until now, it's been tied to the player object so let's change it so it takes two arguments, the timeDelta I introduced earlier and a new entity, which is any object that has the properties needed to move it (ie x, y, moveSpeed, rot, etc). The move function is then modified to use this object instead of the player object and our call in gameCycle is changed accordingly. This means that I can now use the same function to move other things - like enemies.
function gameCycle() {

	...

	move(player, timeDelta);
	ai(timeDelta);

	...

}
Now for the actual ai function. For each enemy, I'll calculate the distance to the player and if it's above a certain value (I've used a distance of 4), the enemy will be made to chase the player. I'll do that by setting the enemy's rotation equal to the angle between him and the player and setting his speed to 1. Then I'll call the same move that I used to move the player, only now with the enemy object instead of the player, of course. The same collision rules and such will apply since the move doesn't care what we're moving.
function ai(timeDelta) {
	for (var i=0;i<enemies.length;i++) {
		var enemy = enemies[i];
		var dx = player.x - enemy.x;
		var dy = player.y - enemy.y;
		// distance from enemy to to player
		var dist = Math.sqrt(dx*dx + dy*dy);
		// if distance is more than X, then enemy must chase player
		if (dist > 4) {
			var angle = Math.atan2(dy, dx);
			enemy.rotDeg = angle * 180 / Math.PI;
			enemy.rot = angle;
			enemy.speed = 1;
			var walkCycleTime = 1000;
			var numWalkSprites = 4;
			enemy.state = Math.floor((new Date() % walkCycleTime) / (walkCycleTime / numWalkSprites)) + 1;
		// if not, then stop.
		} else {
			enemy.state = 0;
			enemy.speed = 0;
		}
		move(enemies[i], timeDelta);
	}
}
This is also where I set the state property used above in the renderEnemies function. If the enemy is not moving, the state is simply 0 (the "standing still" image). If the enemy is moving, then I'll make it cycle through states 1 through 4. By using the % (modulo) operator on the current time with the time for a complete walk cycle as the divisor, we've got a nice time-based walk cycle.
And there we have it! As illustrated in Figure 5, the guards will now run after the player until they are within a certain distance. Admittedly, this is not the most advanced AI yet, but it's a start. Trying to trap them in corners makes for good fun, for a few minutes anyway!
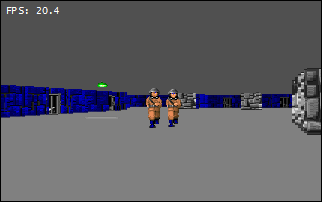
Figure 5: Being chased by evil guards.
Next time
Thanks for reading - I hope you've had fun so far. In the next article I will probably look at some of the following topics:
- Weapons / shooting. Now that we have enemies, we need a simple, efficient way of getting rid of them, and what better way to do that than with guns!
- Pickups (gold, ammo, etc). This would tie in with adding player stats like score and health.
- Interface / HUD. Once we have numbers, we need to display them somewhere.
- Sounds. The gunning down of enemies should be accompanied by delicious sounds.
This article is licensed under a Creative Commons Attribution, Non Commercial - Share Alike 2.5 license.
Comments
The forum archive of this article is still available on My Opera.
No new comments accepted.